
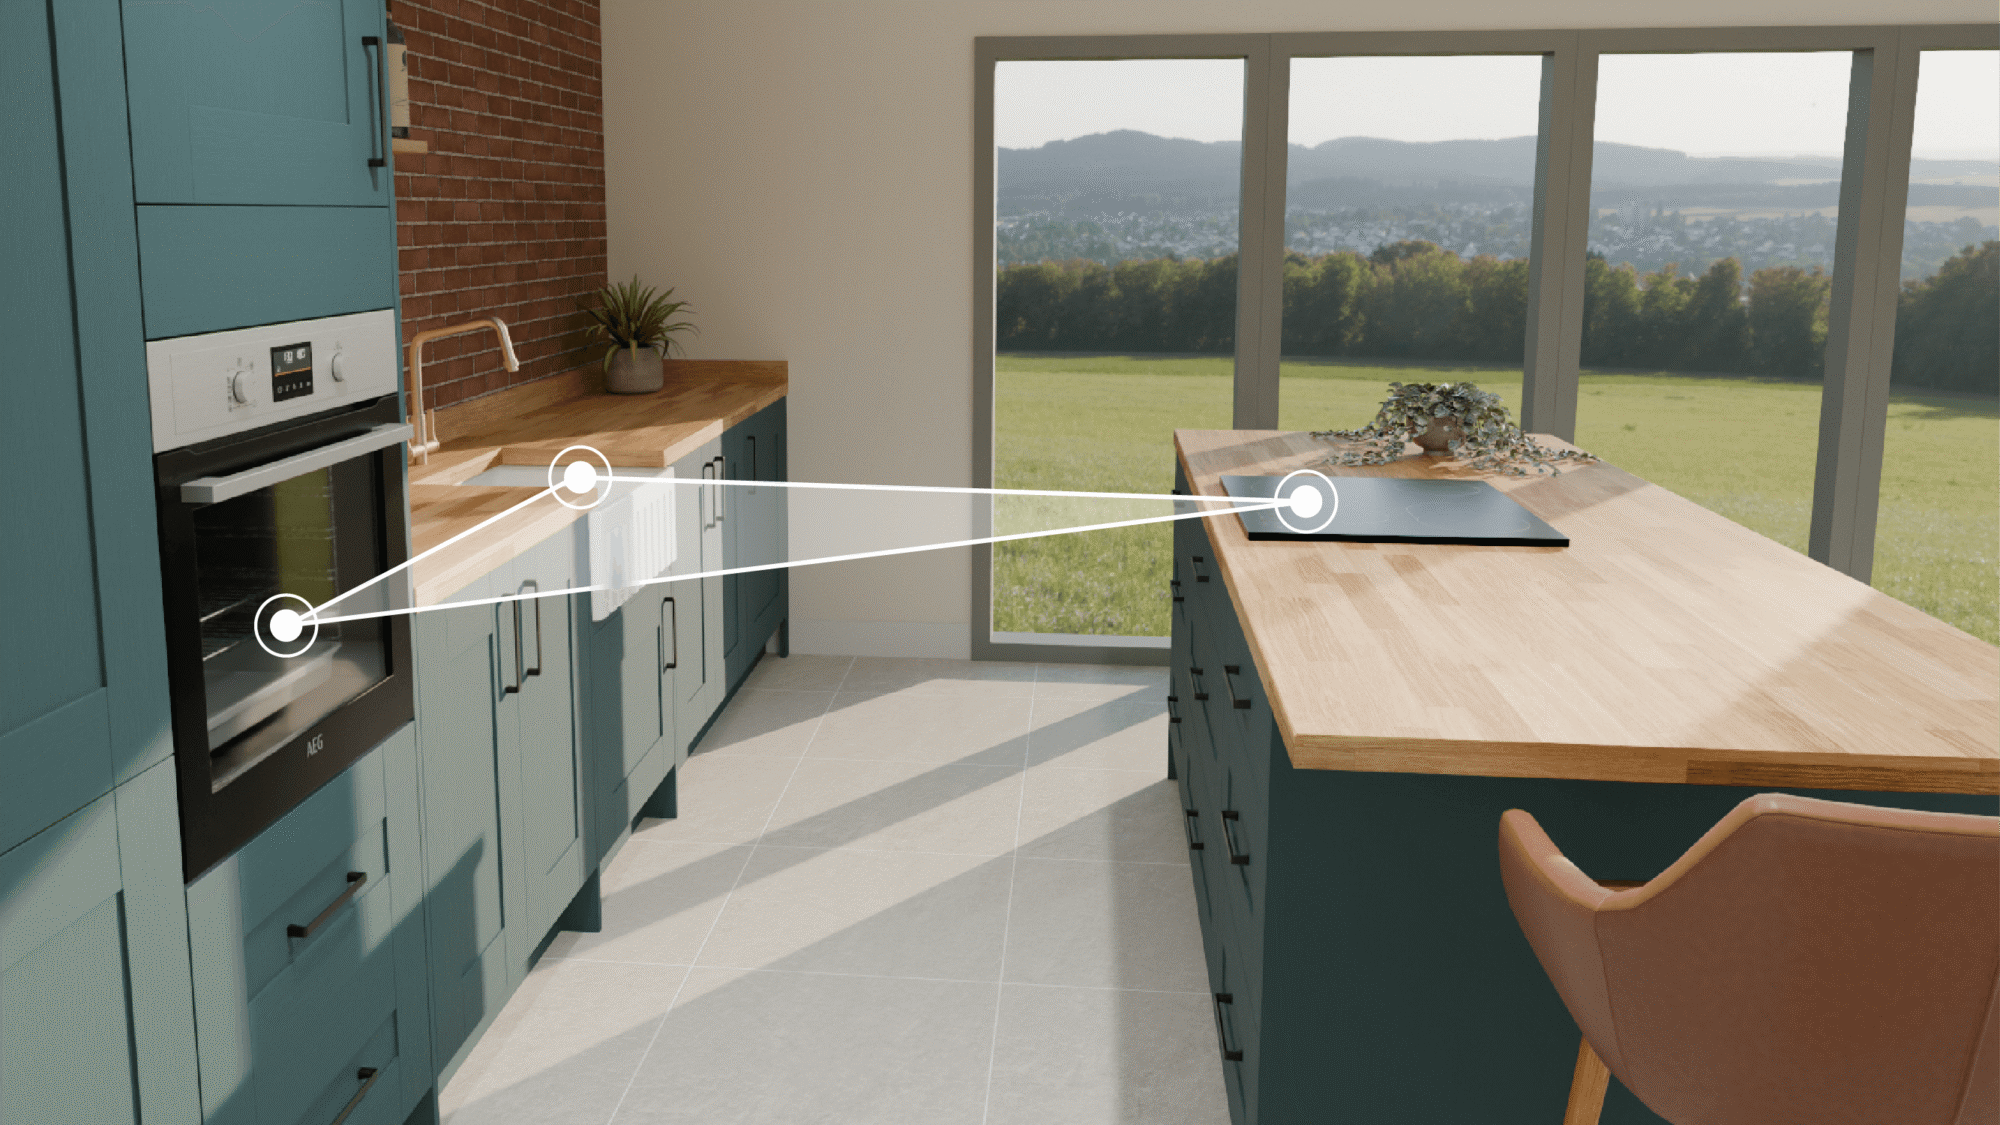
The kitchen triangle rule guides sink, stove, and fridge placement to minimize steps while cooking. See how it works in different layouts, and decide if the triangle rule, work zones, or a hybrid suits your kitchen.
Inside this article:
- How to use the kitchen triangle rule, step by step
- Quiz: Should you use the triangle, zones, or both?
- Best kitchen layouts for the triangle rule
- Real-world kitchen triangle examples
- Tools and prep for designers or remodelers
Article summary:
The kitchen triangle rule arranges the sink, stove, and refrigerator to improve workflow while cooking. It covers the three stations, how far apart they should be, and where to measure from. In this article, you’ll find step-by-step guidance for applying the triangle to a kitchen, accompanied by visual examples for L-shaped, U-shaped, galley, island, and peninsula kitchens. It explains landing zones, clearances, common mistakes, specific scenarios, and tools to assist with layout planning. To help you determine which suits your needs, an included quiz will guide you to using the triangle, work zones, or a hybrid of both.
Understanding the kitchen triangle rule
The kitchen triangle arranges the sink, stove, and refrigerator for efficient cooking. Each should be close enough to reach comfortably without extra steps but far enough apart so cabinets, drawers, and people don’t collide.
It wasn’t always this way. Before the work triangle existed, kitchen equipment ended up wherever it fit, and cooks walked hundreds of unnecessary steps per meal as a result. It took a new generation of researchers to start asking why.
Christine Frederick’s The New Housekeeping (1912) argued that equipment must follow the sequence of tasks. Lillian Moller Gilbreth’s “Kitchen Practical” (1929) narrowed the focus to three stations and designed a tight circular route between them. The University of Illinois formalized the dimensions in the 1940s, and the National Kitchen and Bath Association (NKBA) adopted those guidelines as the planning standards still used today.
Historical illustration (1921) showing how to group kitchen equipment
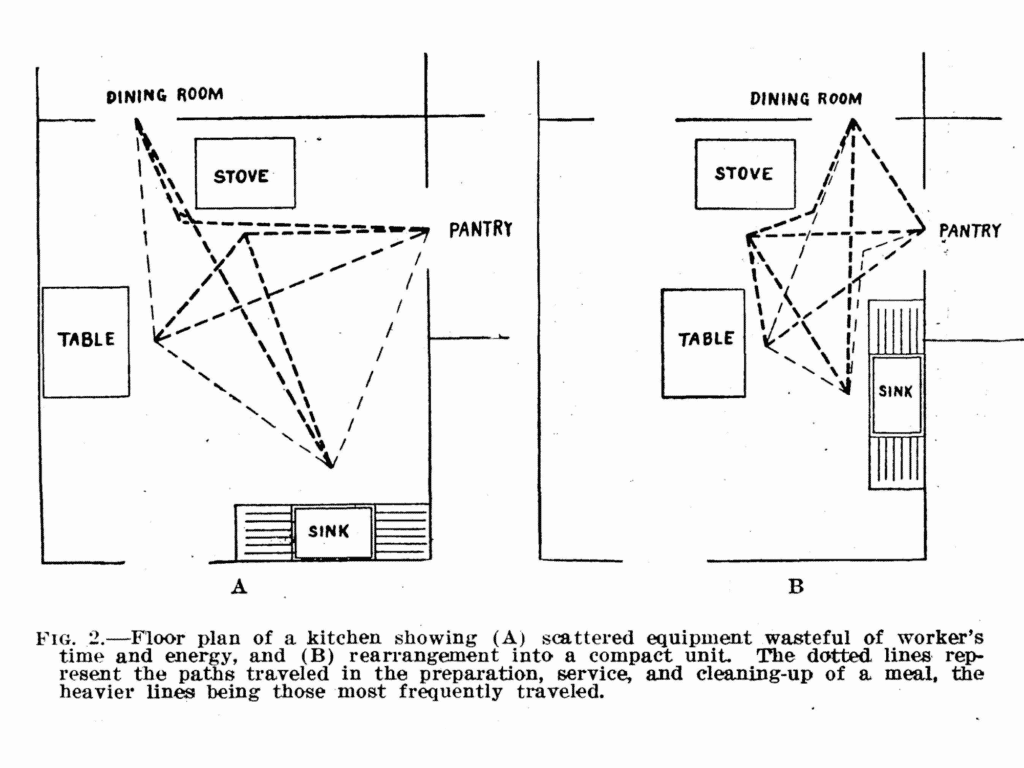
A 1921 USDA Farmers’ Bulletin illustrated how kitchen equipment placement directly affects worker efficiency — an early precursor to the kitchen work triangle concept codified by researchers later that decade. (Source: U.S. Department of Agriculture, Farmers’ Bulletin No. 607, 1921, via Internet Archive.)
So, how does this affect your kitchen? You already know what a sink, stove, and fridge are for. What matters here is thinking about what happens at each station during cooking and why their placement relative to each other matters so much:
- The sink gets the most traffic in most kitchens. Washing, rinsing, filling pots, draining pasta, and cleaning as you go. It’s also the hardest station to move because of plumbing, which is why many designers start the triangle here.
- The stove (or cooktop) is where the actual cooking happens. Think about carrying a full pot of water from the sink to the stove. If that’s a long walk, you’re not just wasting time; you’re risking a spill every single time. But the stove can’t be right on top of the sink either, or two people working at the same time will be in each other’s way.
- The refrigerator is where ingredients come from at the start of a meal and where leftovers go at the end. It’s also the station that non-cooks hit the most, especially kids grabbing snacks or drinks. Where you put the fridge affects whether that traffic cuts through the cooking zone or stays out of the way.
Most cooking tasks move you between these three spots. When they’re arranged well, the flow is seamless. When they’re not, every trip is a hassle.
Professional kitchen designers consistently incorporate the triangle principle early in project planning. The triangle is a flexible system that connects three essential stations to support optimal workflow and prevent functional issues from being overshadowed by aesthetic decisions.
The kitchen triangle is often considered by designers alongside kitchen work zones, which are a separate concept entirely. Kitchen work zones organize a kitchen by task (cooking, prep, cleanup, storage, serving) rather than by appliance position. Which approach works best depends on the kitchen, and a quiz later in this article walks you through that decision step by step.

Shantel Tempel, Product Owner for Kitchens, 3D Cloud
“3D tools allow the user to visualize working in these areas to quickly determine if the zone or triangle is intuitive or complicated. 3D allows us to quickly see the clearance and tasking spaces. Is there enough room to do dishes on either side of the sink or place a hot pan from the oven next to the cooktop? These are hard to interpret when 2D is the only option.”
– Shantel Tempel, Product Owner for Kitchens at 3D Cloud
Kitchen triangle dimensions
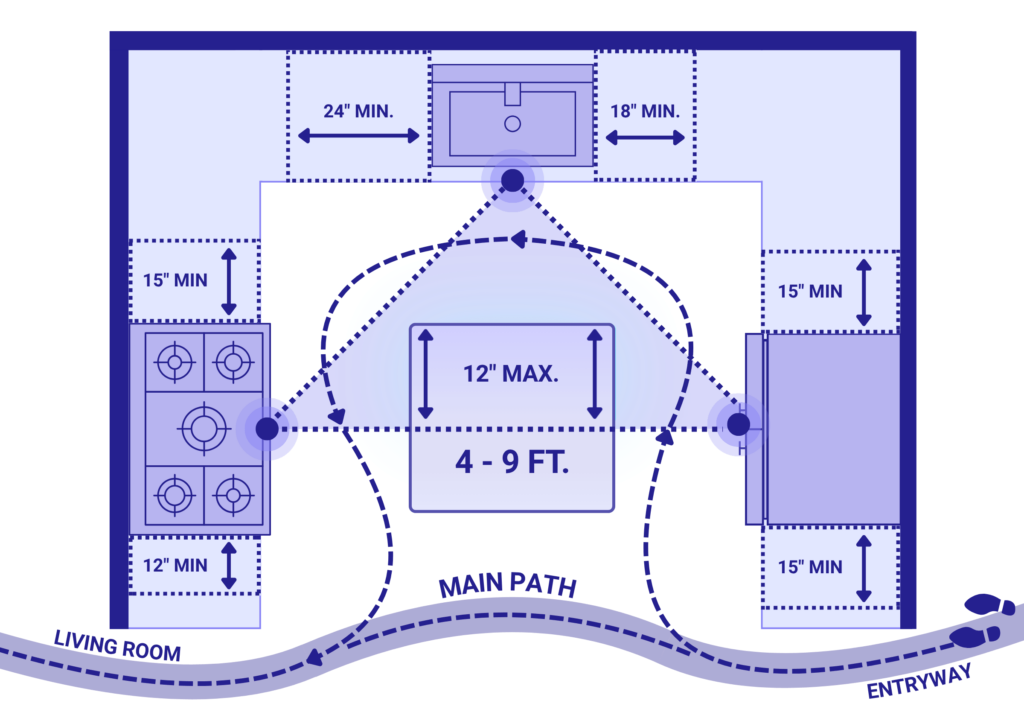
Recommended kitchen triangle dimensions fall into three parts: Each leg of the triangle should measure between 4 and 9 feet. The perimeter of all three legs should be between 13 and 26 feet. And obstacles such as islands or peninsulas shouldn’t intersect the triangle more than 12 inches.
The National Kitchen and Bath Association set these standard dimensions for the work triangle, and they’ve been referenced by designers for decades.
The kitchen work triangle equation
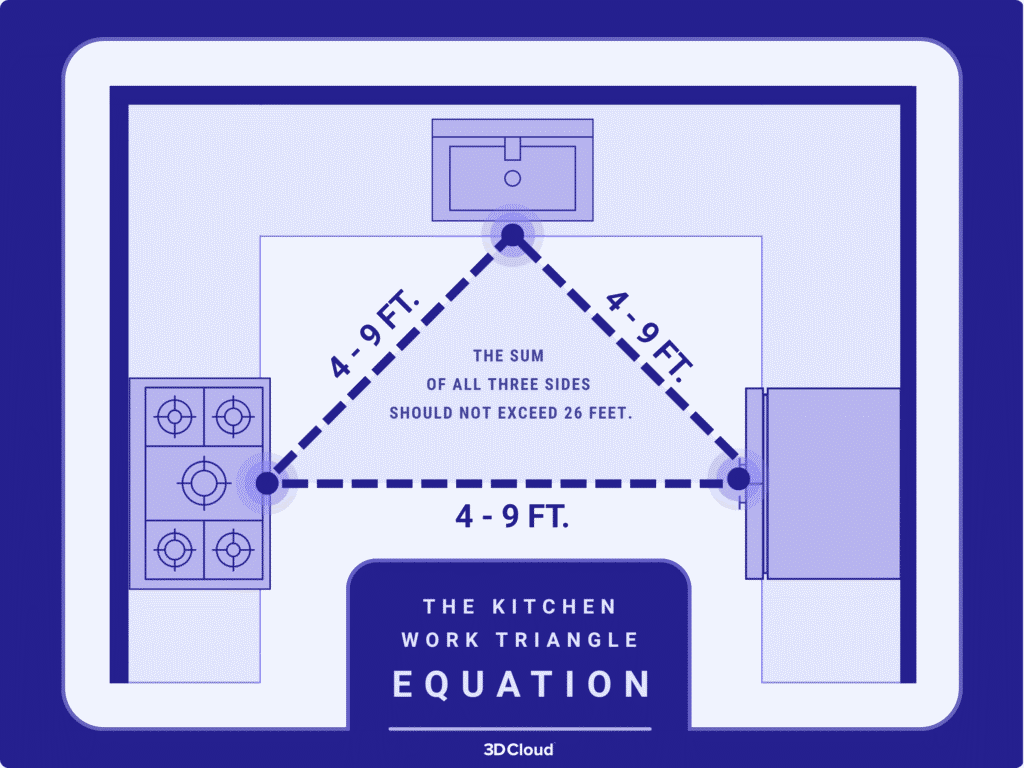
NKBA guidelines specify that each leg of the kitchen work triangle should measure between 4 and 9 feet, with the total of all three sides not exceeding 26 feet.
Some sources cite slightly different numbers (4 to 8 feet per leg, or a 12-foot minimum perimeter), but the differences are minor because these are guidelines, not building codes. The triangle rule is meant to flex across a wide range of kitchen layouts and sizes.
In practice, the upper end of the range is where most problems hide. A triangle measuring 24 or 25 feet technically complies, but it often means the cook has to walk farther than necessary.
To summarize, the core principles the triangle encourages are:
- Avoid crowding between work stations.
- Keep all three stations within comfortable reach.
- Prevent obstacles from breaking the path.

Sarah Hankins, CKBD, Analyst – Specialty Operations at Lowe’s
“Many people view the triangle as a rigid concept that impedes creativity, when it is designed to help designers create spaces that are not only beautiful to look at, but enjoyable to use.”
– Sarah Hankins, CKBD, Analyst – Specialty Operations at Lowe’s
How to measure your kitchen triangle correctly
Measure the kitchen triangle from the center front edge of each appliance, along the floor, in a straight line between each pair of points. Consistency matters here because the difference between a functional triangle and a cramped one can come down to inches.
Kitchen work triangle — the three points
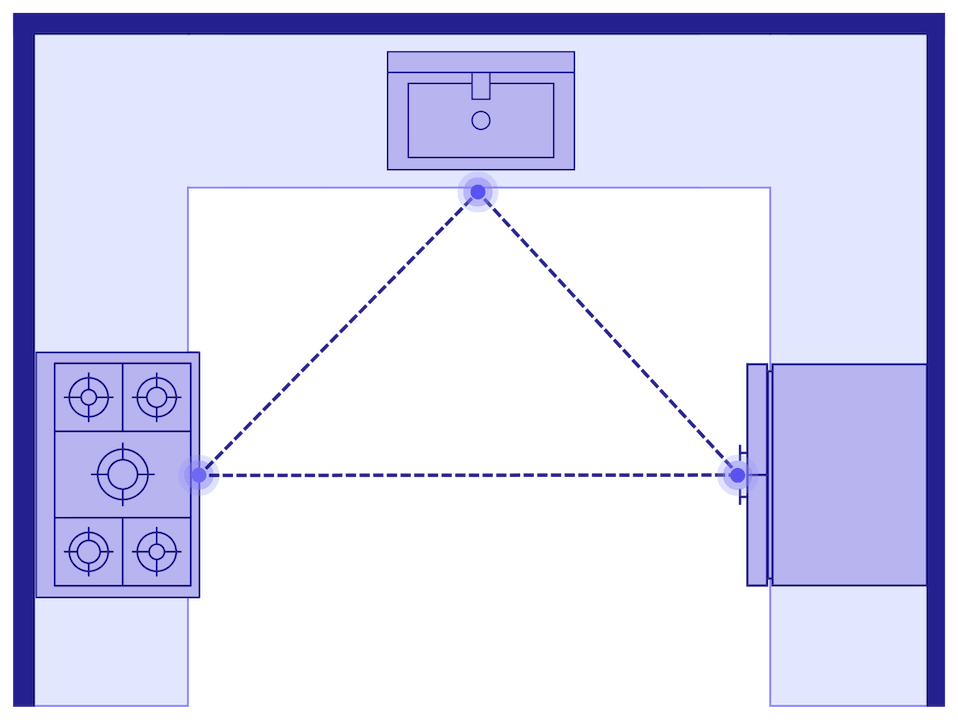
The three points of the kitchen work triangle — sink, stove, and refrigerator — form the core of an efficient kitchen layout regardless of the overall kitchen shape.
Where to measure from:
- Sink: measure from the center of the basin’s width at the front rim.
- Cooking surface: the center of the cooking surface at the front edge.
- Refrigerator: the center of the door at the front face. If the fridge is set into a cabinet surround, measure from the door, not the cabinet face. Staying consistent across all three points is what makes the measurement useful.
Follow these tips as you measure the kitchen triangle:
- Measure along the floor, not the counter. The triangle represents the walking path, not the counter surface. Do not measure along the countertop or follow the wall. Instead, measure in a straight line along the floor between each pair of points.
- Handling islands and peninsulas. If an island sits between two points, measure the straight-line distance first, then check whether the island intersects that leg by more than 12 inches. If it does, the triangle is effectively broken at that leg, and the actual walking distance around the island becomes the real measurement. Peninsulas create similar issues. Measure from the appliance to the nearest point a person would actually walk around, as they often create a pinch point that lengthens one leg by forcing a detour.
Kitchen work triangle — island and obstacle clearance
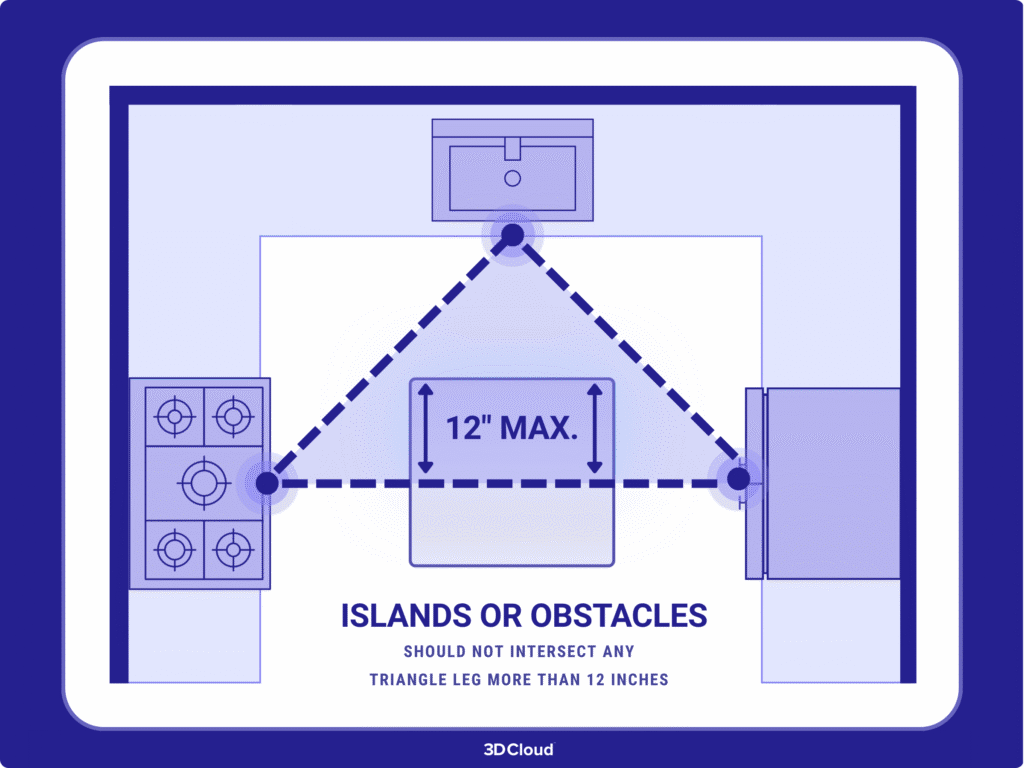
An island or obstacle that intersects a triangle leg by more than 12 inches effectively breaks that leg of the triangle and should be avoided.
- Door swings and drawer clearances. A refrigerator door that opens directly into the sink work zone, or an oven door that blocks the path to the refrigerator, can undermine an otherwise well-proportioned triangle. Walk through the full swing arc of every appliance door and major drawer in the triangle zone before finalizing placement.
- Open-concept kitchens. The lack of walls does not change the relationship between the three stations. The triangle still applies. But open layouts invite more foot traffic through the work area, so keeping household traffic out of the triangle becomes even more important. Trace the paths people take through the kitchen to reach other rooms and confirm they don’t cut through the triangle.

Natalia Gesiorski, 3D Cloud’s Head of Training and Design Strategy
“Realistically, open concept kitchens have at least one wall, so you start there and include the peninsulas or islands. The ‘invisible walls’ are where the cabinets will go or already are. Nothing changes!”
–Natalia Gesiorski, Head of Training & Design at 3D Cloud
How to use the kitchen triangle rule, step by step
Apply the kitchen triangle by starting with the sink, placing the stove and fridge around it, then measuring and testing the layout for obstacles and traffic. These steps work whether you’re designing from scratch or renovating an existing kitchen.
- Start with the sink. The sink is usually the most-used station in a kitchen and the hardest to relocate because of plumbing. In most layouts, it anchors the triangle. If your sink is already in a fixed position, begin there and position the other two points around it. Reserve at least 24” of counter space on one side, and 18” on the other to optimize the work surface around the sink.
How to position the sink

Start with the sink, allowing at least 24 inches of counter space on one side and 18 inches on the other to support prep and cleanup.
- Place the stove or cooktop. The stove should be within reach of the sink. A minimum of 4 feet between the sink and stove is the standard guideline. The stove should be placed against a wall with adequate ventilation. Include at least 15 inches of surface width on one side and at least 12 inches on the other.
How to position the cooking surface
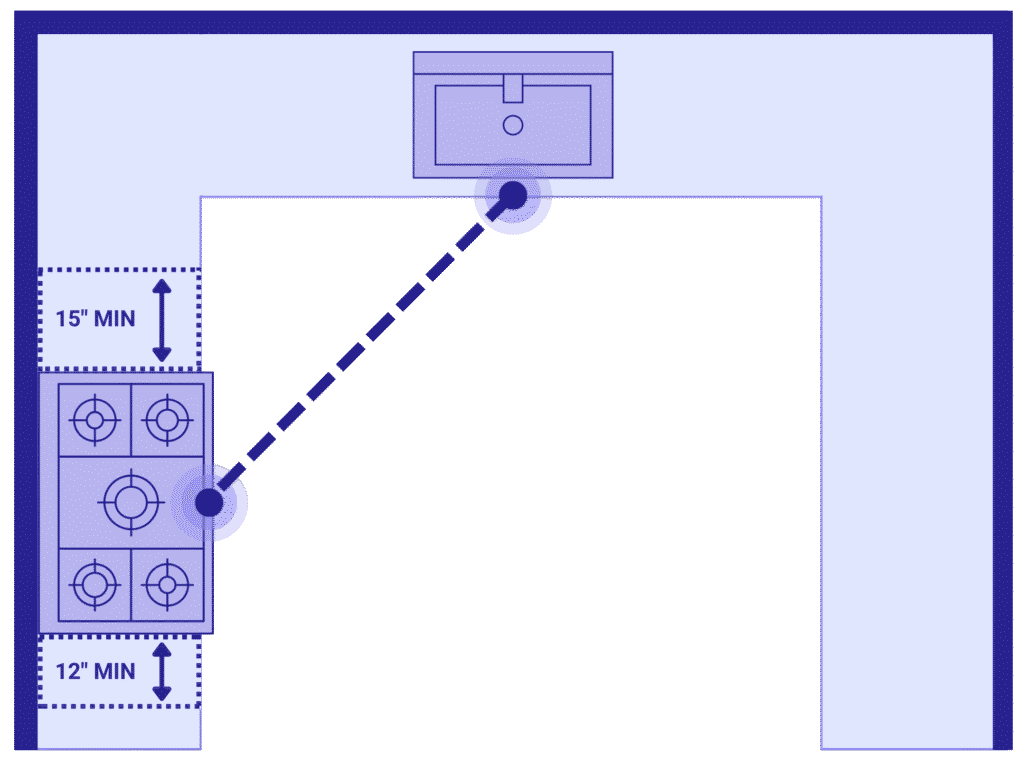
Position the stove against a wall with ventilation access, with at least 15 inches of counter on one side and 12 inches on the other.
- Position the refrigerator. The fridge completes the triangle. Place it near the kitchen entry so groceries can be put away without crossing the cooking area, and make sure it’s accessible from both the sink and stove. The door should open toward the nearest counter, with 15″ of landing space on either side.
How to position the refrigerator
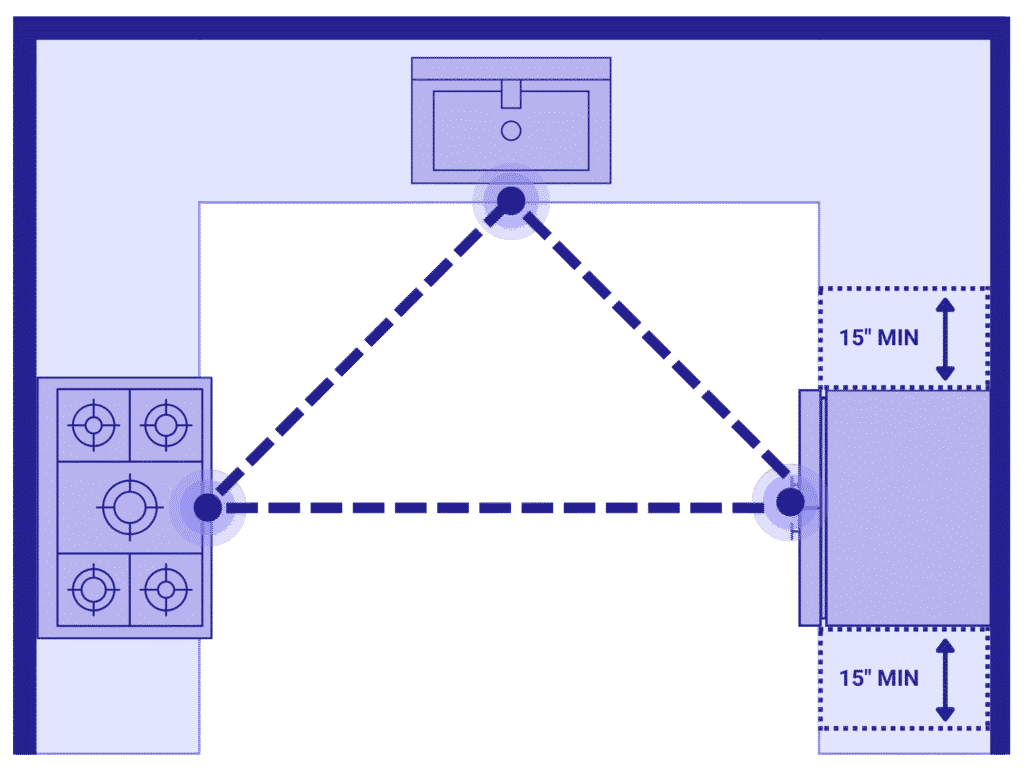
Place the refrigerator near the kitchen entry with 15 inches of landing space on each side so the door can open without blocking the workflow.
- Measure the triangle. Using the measurement approach described above, confirm that each leg falls between 4 and 9 feet and the total perimeter is between 13 and 26 feet. If one leg is too short, the stations are crowded. If one leg is too long, the cook wastes steps.
How to confirm the triangle measurements
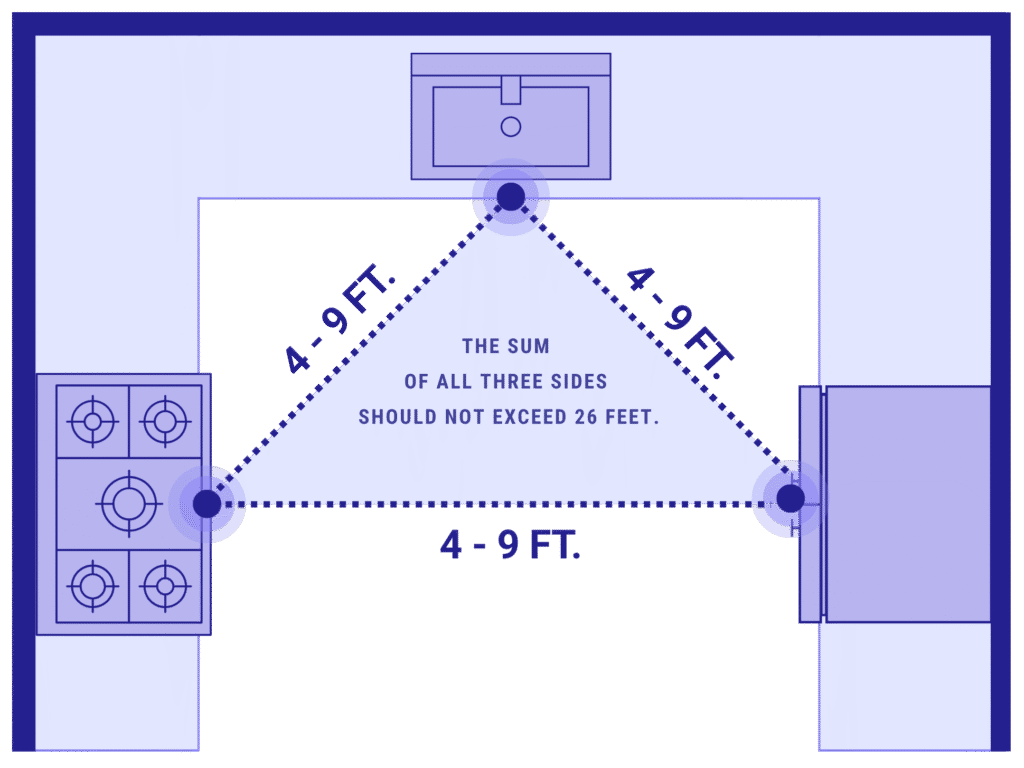
Confirm each leg falls between 4 and 9 feet and the total perimeter stays between 13 and 26 feet before finalizing the layout.
- Identify obstacles. Walk the path between each pair of stations. Look for islands, tall cabinets, seating, or other elements that intersect a leg by more than 12 inches. If they do, adjust the placement or reconsider the obstacle’s position.
How to address obstacles

Walk each leg of the triangle and flag any island, cabinet, or seating that intersects a leg by more than 12 inches.
- Verify traffic flow. Trace the path that household members take through the kitchen to reach other rooms. If that path crosses through the triangle, redesign the traffic route or adjust the triangle so the main corridor runs outside the work zone.
How to map traffic flow
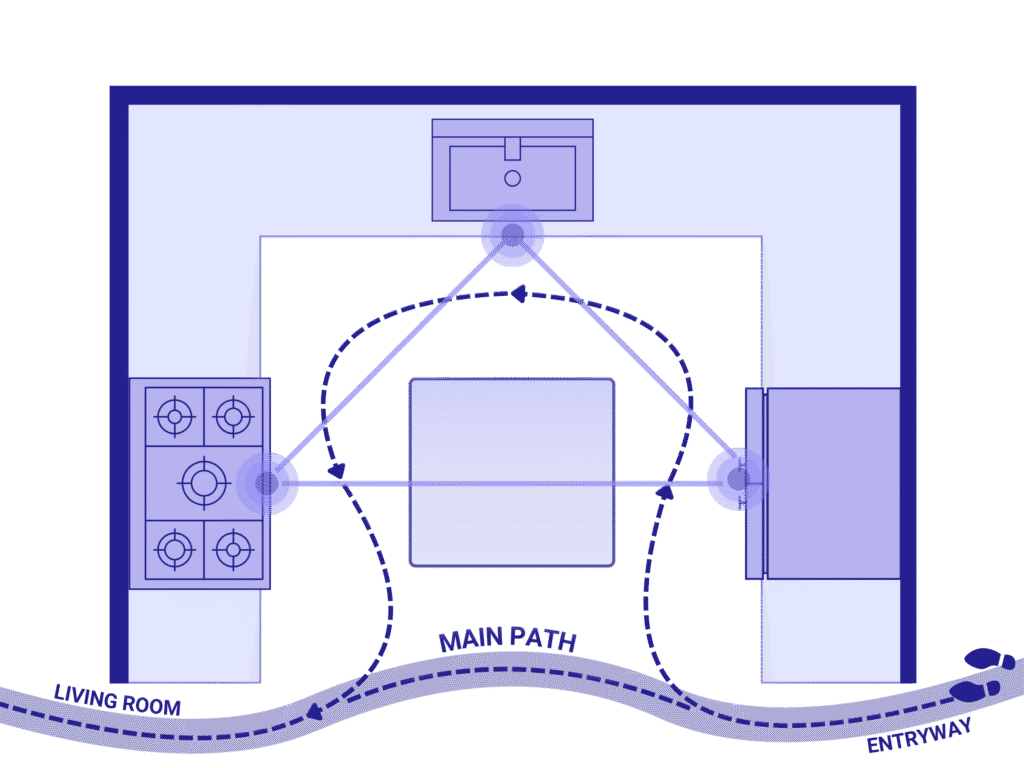
If the main household traffic path crosses through the triangle, adjust the layout so the corridor runs outside the work zone.
- Test the layout. A floor plan shows distances. A 3D view shows whether the space actually works. Door swings, sightlines, clearances, and the way the room feels to move through are difficult to evaluate on a flat drawing alone. If you have access to a 3D kitchen planner, build the layout and walk through it virtually before making final decisions.
Viewing your space in 3D is an essential step to confirm the design is valid, and the space will flow well.
Is the kitchen triangle rule outdated?
The triangle is not outdated per se, but for many modern kitchens, it is not enough on its own. The core principle still holds: minimize unnecessary movement between the sink, stove, and refrigerator. What has changed is the kitchen around it.
When the NKBA rewrote its Kitchen & Bath Design Guidelines in 2022, the task force did not drop the triangle. They expanded it into what the association now calls a “work route,” connecting additional stations like prep, storage, serving, and eating space alongside the three main stations.
The idea of organizing kitchens by task actually goes back to 1912, when Christine Frederick argued that equipment should be grouped to match the sequence of work. Gilbreth narrowed that thinking to three stations. As the 1931 Better Homes Manual put it, the point was never to discourage walking. It was to make sure that exercise happened outdoors in the fresh air, not “in a treadmill round of refrigerator to sink, to stove and back again.”
Over a century later, the industry is still balancing the two approaches, but that core goal hasn’t changed. The triangle keeps the cooking workflow tight. Zones fill in everything around it. The real question is whether the triangle alone is enough for your kitchen, and the quiz below can help you decide.
Quiz: Should I use the kitchen triangle, kitchen zones, or both?
Use this quiz to decide which planning approach fits your kitchen. For each row, pick the side that sounds more like your situation.
Natalia Gesiorski, 3D Cloud’s Head of Training and Design Strategy
“I still think the triangle is needed, but zones are part of that triangle. You determine the zones, and they usually, more often than not, will form your working triangle. None of it is outdated – it’s just more personalized by the designer or the client.”
–Natalia Gesiorski, Head of Training & Design at 3D Cloud
Landing zones and clearances that make the kitchen triangle work
Counter space next to each station, aisle width, and seating clearance determine whether a well-proportioned triangle actually feels functional in daily use. Without adequate landing zones, even a perfectly measured triangle falls apart:
- Near the sink: At least 24 inches of counter on one side and 18 inches on the other. The sink sees the heaviest use of any station in the kitchen. Without adequate landing space, dirty dishes stack up, drying racks crowd the prep area, and the sink becomes a bottleneck.
- Near the stove: At least 15 inches of counter on one side and 12 inches on the other. Hot pots need somewhere to land immediately. A stove with no adjacent counter forces the cook to carry hot items across the kitchen.
- Near the refrigerator: At least 15 inches of counter on the handle side. When unloading groceries or pulling ingredients for a recipe, the counter next to the fridge acts as a staging area. If it is missing, everything gets piled on the nearest available surface.
- Aisle width: 42 inches minimum for one cook. 48 inches for two or more cooks. Aisle width affects how easily people can move through the triangle without interrupting each other. In kitchens where the island faces the main counter run, this dimension is especially important.
- Seating clearance: If the island includes seating, allow 32 inches from the counter edge to any wall or cabinet when no traffic passes behind the stools, and 44 inches when it does. Seating that encroaches on the triangle path creates exactly the kind of obstruction the 12-inch rule is meant to prevent.
Natalia Gesiorski, 3D Cloud’s Head of Training and Design Strategy
“In my opinion, people overlook the prep zone and the small appliance zone. People end up putting all their small appliances on their counters and forget that that used to be the prep zone. So now it’s a cooking zone, and the prep zone disappears.”
–Natalia Gesiorski, Head of Training & Design at 3D Cloud
Best kitchen layouts for the triangle rule
The triangle works differently in every kitchen shape. L-shaped, U-shaped, galley, one-wall, and peninsula layouts each create different opportunities and constraints for where the three stations land and how the triangle forms between them.
L-Shaped kitchen triangle
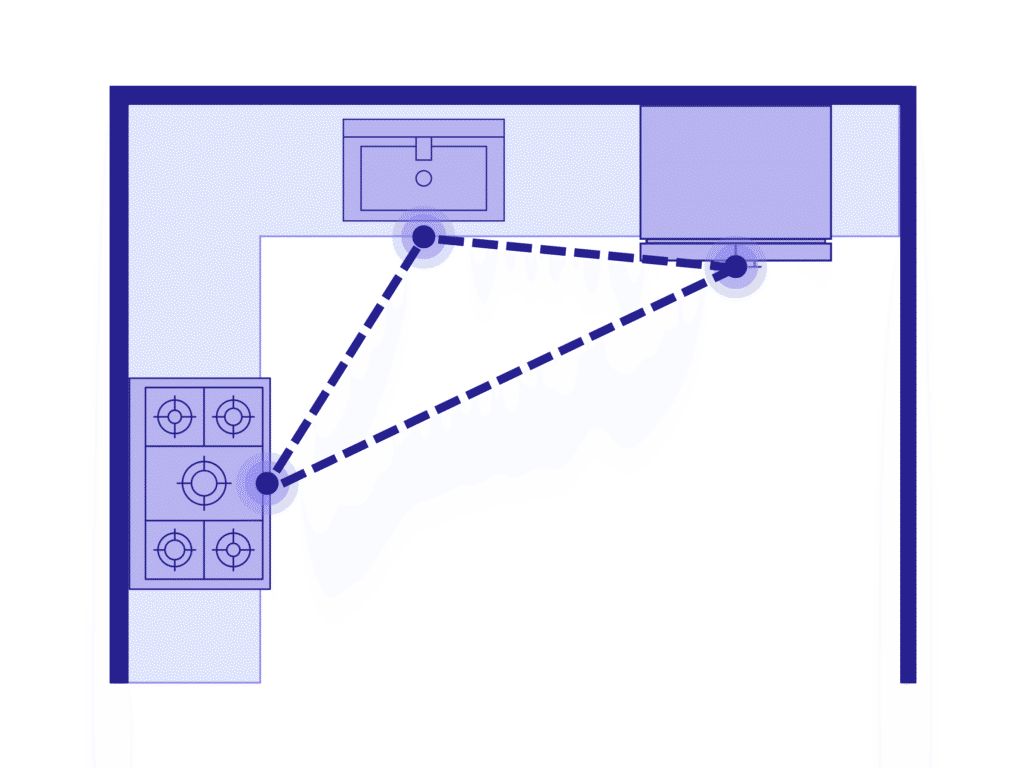
In an L-shaped kitchen, the triangle naturally forms across the two walls — just avoid placing the sink deep in the corner, which shortens two legs and crowds the workspace.
L-shaped kitchens
The L-shaped kitchen places cabinets and appliances along two perpendicular walls. The triangle typically forms with the sink at the corner or along one wall, the stove on the longer wall, and the fridge at the far end of either arm.
L-shaped layouts are one of the most natural fits for the triangle because the two walls create a contained work zone without boxing the cook in. The open side leaves room for a dining area or island without interrupting the triangle path.
The most common mistake in L-shaped kitchens is placing the sink deep in the corner, which shortens two of the triangle’s legs and crowds the workspace. Moving the sink slightly away from the corner and using that corner for storage gives the triangle more breathing room.
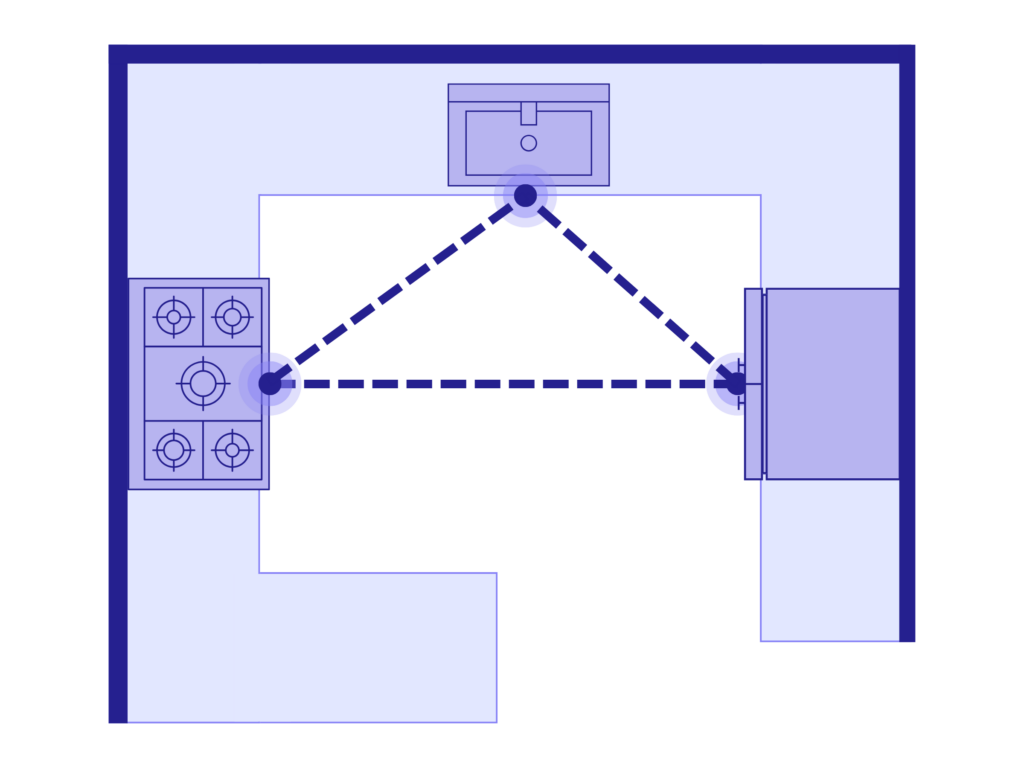
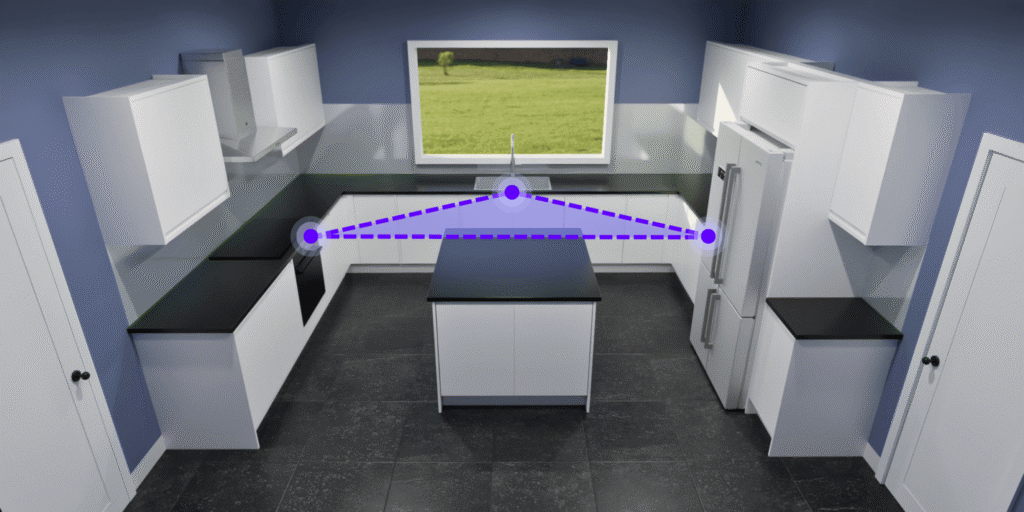
U-Shaped kitchen triangle
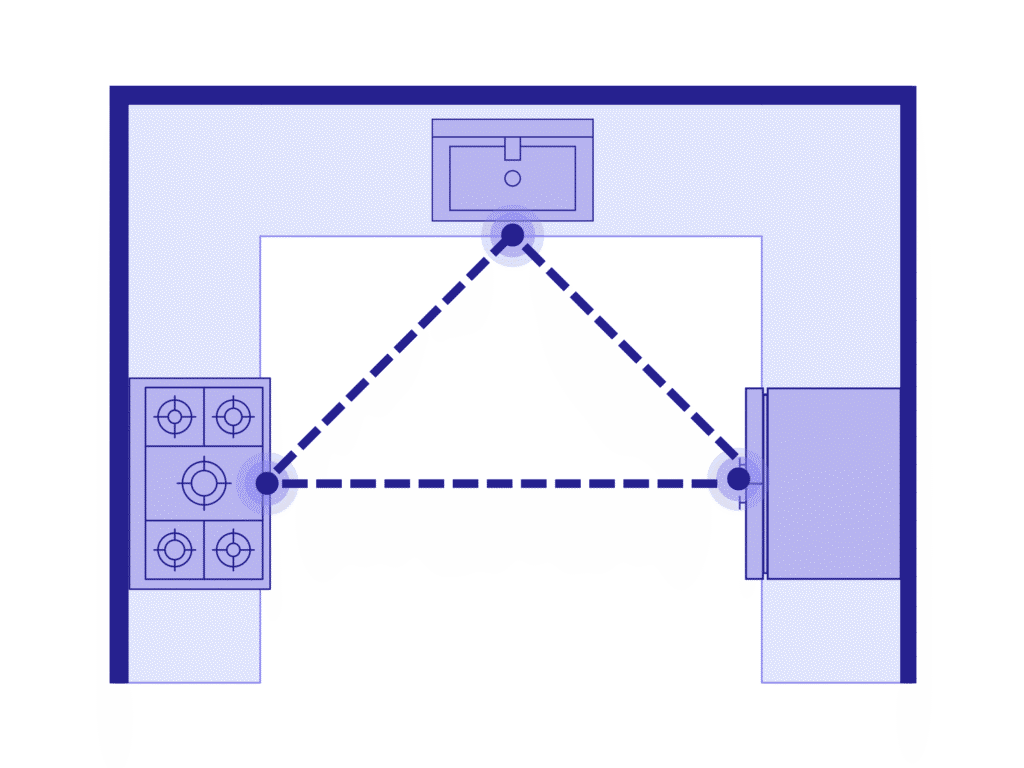
U-shaped kitchens are one of the most efficient layouts for the triangle, with each station on its own wall — just watch the aisle width in smaller footprints.
U-shaped kitchens
U-shaped kitchens use three walls of cabinetry, creating one of the most efficient layouts for the triangle. Each station can occupy its own wall, with clear sightlines and short walking distances between all three points.
The risk in U-shaped kitchens is making the triangle too tight. When the kitchen footprint is small, the three stations end up closer together than intended, and drawer pulls, appliance doors, and people begin to conflict. In a narrow U, aisle width often drops below the 42-inch minimum, making the layout feel cramped even when the triangle dimensions are technically within range.
In larger U-shaped kitchens, the opposite problem appears: the triangle gets too spread out. Keeping all three stations on two of the three walls, rather than spreading them across all three, can help.
Galley kitchen triangle
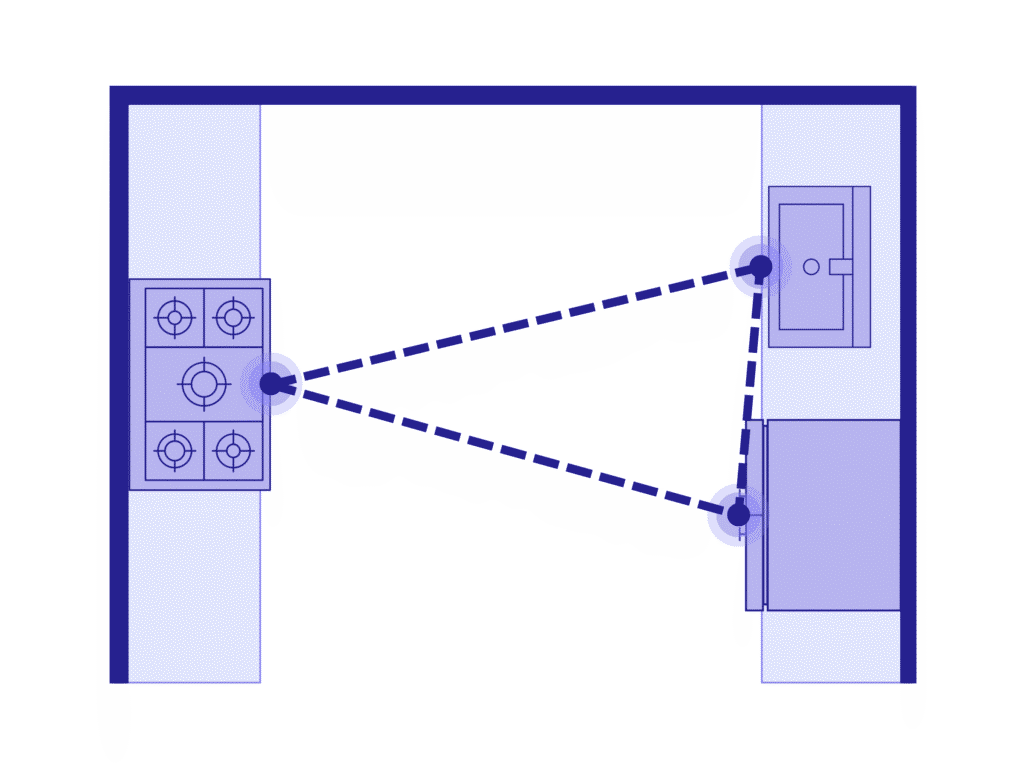
In a galley kitchen the triangle forms across the aisle — maintain at least 42 inches of width, and 48 if more than one person uses the kitchen.
Galley kitchens
Galley kitchens run along two parallel walls. The triangle forms across the aisle, with stations split between the two sides. A common arrangement places the sink and stove on one wall and the fridge on the opposite wall.
Aisle width is the critical dimension in galley kitchens. Too narrow, and two people cannot pass each other. Too wide, and the cook wastes steps crossing back and forth. The 42-inch minimum applies here, and 48 inches is strongly preferable when more than one person uses the kitchen at the same time.
Galley kitchens that serve as a pass-through to another room violate the traffic-through-triangle guideline by design. If the galley is open on both ends, consider placing all three triangle stations on the same side so the opposite wall serves as the traffic corridor.
One-wall kitchen triangle
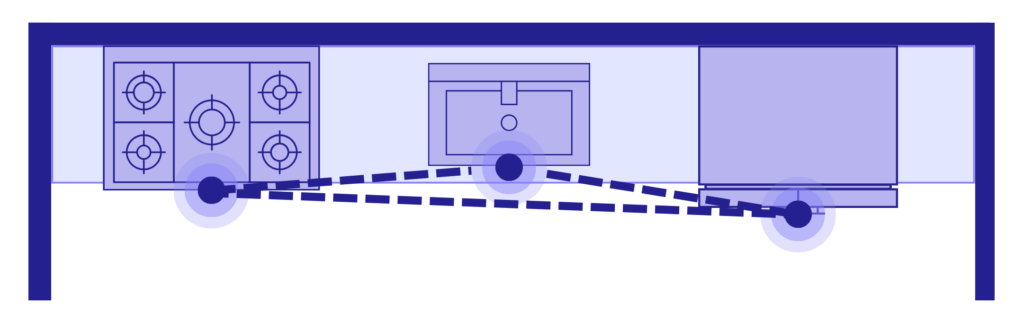
A one-wall kitchen layout places the range, sink, and refrigerator along a single wall, forming a flattened work triangle suited to small spaces and open-concept floor plans.
One-wall kitchens
A one-wall kitchen arranges all cabinetry and appliances along a single wall. A true geometric triangle is not possible. The three stations form a line, and the efficiency question becomes about sequence and spacing rather than triangular geometry.
The most functional arrangement places the sink in the center, with the stove on one side and the fridge on the other. One-wall kitchens benefit more from work zone thinking than from the triangle. Grouping prep tools near the sink, cooking tools near the stove, and storage near the fridge creates a linear workflow that compensates for the lack of a triangle.
G-shaped kitchen triangle
In a G-shaped kitchen, the peninsula can either become a triangle point or act as an obstacle — the 12-inch rule determines which.
Peninsula and G-shaped kitchens
A peninsula extends from one wall, creating an additional work surface that partially encloses the kitchen. A G-shaped kitchen is essentially a U-shape with a peninsula added.
Peninsulas affect the triangle in two ways. If an appliance sits on the peninsula, it becomes part of the triangle. If not, the peninsula can create a pinch point that forces the cook to walk around it, effectively lengthening one leg.
The 12-inch rule applies here. If the peninsula cuts across the straight-line path between two triangle points by more than a foot, it is acting as an obstacle. In G-shaped kitchens, the narrowed entry near the peninsula is the most common trouble spot for traffic flow.
Sarah Hankins, CKBD, Analyst – Specialty Operations at Lowe’s
“[In an L-shaped kitchen,] none of the work zones are far away from each other, and the kitchen doesn’t impede traffic. … It’s useful and would be easy to cook in. A second person could use the sink and access the refrigerator without getting in the way of someone at the stove.”
– Sarah Hankins, CKBD, Analyst – Specialty Operations at Lowe’s
How to use the triangle rule with an island
Whether an island helps or hurts the kitchen triangle depends on its size, placement, and what it contains. An island that houses one of the three stations (usually a cooktop or prep sink) becomes part of the triangle. One that sits in the triangle’s path without contributing a station breaks it.
If the straight-line distance between the fridge and the stove passes through the island, and the cook must walk around it every time, the triangle is functionally broken.
Seating on the island creates an additional consideration. Bar stools and the space required behind them can push the effective width of the island into the triangle zone. In tighter kitchens, an island with seating on the triangle-facing side often forces the cook to squeeze past occupied stools to reach the fridge or stove.
When the island is too large or poorly placed to support a clean triangle, consider shifting the primary triangle to the perimeter and treating the island as a secondary work zone for prep, serving, or cleanup. A prep sink on the island can create a secondary path without disrupting the main one.
Shantel Tempel, Product Owner for Kitchens, 3D Cloud
“Islands can have a big impact on a work triangle. Islands have an appeal to them that peninsulas don’t. However, a peninsula may be the better option in these situations because they don’t create obstacles that will have to be accommodated for in everyday use of the space. You don’t want to have to walk around the island to get to the fridge or microwave.”
– Shantel Tempel, Product Owner for Kitchens at 3D Cloud
Modern kitchens: combining the triangle with work zones
Most kitchens over 200 square feet or with open-concept layouts work best when the triangle and work zones are used together. The triangle handles the core cooking path between the sink, stove, and fridge. Zones handle everything else.
A practical approach is to build the triangle first, then layer zones around it. The cooking zone anchors around the stove. The prep zone sits between the sink and the stove, where cutting boards, knives, and mixing bowls get the most use. The cleanup zone wraps around the sink and dishwasher. The pantry or storage zone groups dry goods, canned items, and bulk supplies in a location accessible from both the cooking and prep zones but out of the main work path.
Secondary zones, such as a beverage station, coffee bar, snack zone, or baking area, should sit entirely outside the triangle. These zones are frequently used by other household members, and placing them inside the triangle invites the traffic conflicts the rule is designed to prevent.
Sarah Hankins, CKBD, Analyst – Specialty Operations at Lowe’s
“You can even take the triangle concept further and adapt it to the customer’s needs. For example, your customer wants to make their wall oven into a baking center. They want to roll out crusts, knead bread, use the mixer, so they don’t care about being right next to the sink, but they do want access to their tools. The triangle for that space could be the oven, the storage for their ingredients, and the workspace they use for prep.”
–Sarah Hankins, CKBD, Analyst – Specialty Operations at Lowe’s
Designing for multiple cooks and busy households
Kitchens with two or more cooks need wider aisles, separated workflow paths, and sometimes a second triangle or dedicated work zone. The single-cook triangle still serves as a starting point, but the layout around it must accommodate more people moving at once.
The first adjustment is aisle width. The NKBA guideline increases the minimum from 42 inches to 48 inches when two or more people share the kitchen. In practice, even 48 inches can feel tight if two people are working at adjacent stations with open cabinet doors and hot pans.
The second adjustment is separating the cleanup path from the cooking path. If the sink and dishwasher are positioned so that loading dishes requires standing in front of the stove, two people cannot work simultaneously without bumping into each other. Moving the cleanup zone to a separate counter run or island relieves that pressure.
A secondary triangle can be created by adding a prep sink to the island or a secondary counter. For homes with children or frequent traffic, placing the fridge outside or at the edge of the triangle keeps the snack-and-drink run from interrupting meal preparation.
According to the 3D Cloud Kitchen & Bath Project Planning Trends Study 2025, 74% of homeowners are more likely to complete their project with a retailer that offers 3D planning tools. Being able to visualize multi-cook scenarios in 3D before committing to a layout makes the planning process more concrete and reduces costly changes later.
Shantel Tempel, Product Owner for Kitchens, 3D Cloud
“I wouldn’t create more triangles [for multiple cooks], I’d just make sure that the zones have sufficient space. Lots of prep, clearance, and a working area [triangle] so that the two people don’t keep running into each other. Consider a prep area with a separate sink.”
– Shantel Tempel, Product Owner for Kitchens at 3D Cloud
Common kitchen triangle mistakes and how to fix them
The most common kitchen triangle mistakes are a triangle that is too small or too large, a fridge placed in the wrong spot, traffic cutting through the work path, missing landing space, and islands or peninsulas that interrupt movement.
Here are the kitchen triangle problems that come up most often, along with practical ways to fix each one:
- The triangle is too small. When all three stations are within 3 to 4 feet of each other, drawers and doors collide, counter space disappears, and the cook feels boxed in. Spread at least one station further along the counter or to a different wall. Even 6 inches of additional distance between the sink and stove can make a noticeable difference.
- The triangle is too large. When the perimeter exceeds 26 feet, the cook wastes steps on every task. Relocate the fridge closer to the main work area, or add a secondary small fridge or beverage center near the cooking zone.
- The fridge is in the wrong spot. A fridge placed deep in the kitchen, past the stove, forces the cook to walk through the cooking zone every time they need an ingredient. Position the fridge near the kitchen entry or at the end of a counter run so it is accessible without crossing the work area.
- Traffic cuts through the triangle. Kitchens that serve as hallways between rooms create constant interruptions. Realign the triangle so the traffic path runs along the kitchen’s perimeter rather than through the center of the work zone. In open-concept layouts, an island can help define the boundary.
- Missing landing zones. A perfectly proportioned triangle with no counter space next to the stove or fridge is functionally broken. Ensure every station has the minimum landing zone described earlier. If counter space is limited, a pull-out cutting board or a small cart can serve as a temporary surface.
- The island blocks the triangle. An oversized island placed between the stove and the sink forces the cook to walk around it on every trip. Either downsize the island, relocate it, or move one of the triangle stations onto the island itself so the obstruction becomes a work station.
Natalia Gesiorski, 3D Cloud’s Head of Training and Design Strategy
“When we were house hunting, we saw a beautiful home, but the kitchen layout was horrible. You had to walk from the sink, all the way around the peninsula, to the other side of the kitchen to get to the refrigerator. It had zero sense. That was one reason why this space fell short, and the kitchen layout was one of the top reasons.”
–Natalia Gesiorski, Head of Training & Design at 3D Cloud
Real-world kitchen triangle examples
How the triangle is applied depends on the kitchen’s size, the household’s habits, and what the space needs to do beyond cooking. These examples show the triangle adapting to real conditions rather than following a rigid template.
A compact single-wall layout with the cooktop on the island keeps all three stations within a few steps.
Small apartment kitchen. In a compact L-shaped or galley kitchen under 100 square feet, the triangle is naturally tight. The priority is keeping all three stations on one or two walls and making sure the aisle is wide enough for one person to work comfortably. In very small layouts, the sink-to-stove leg is often the shortest, sometimes approaching the 4-foot minimum. That works as long as there is at least 15 inches of counter between them.
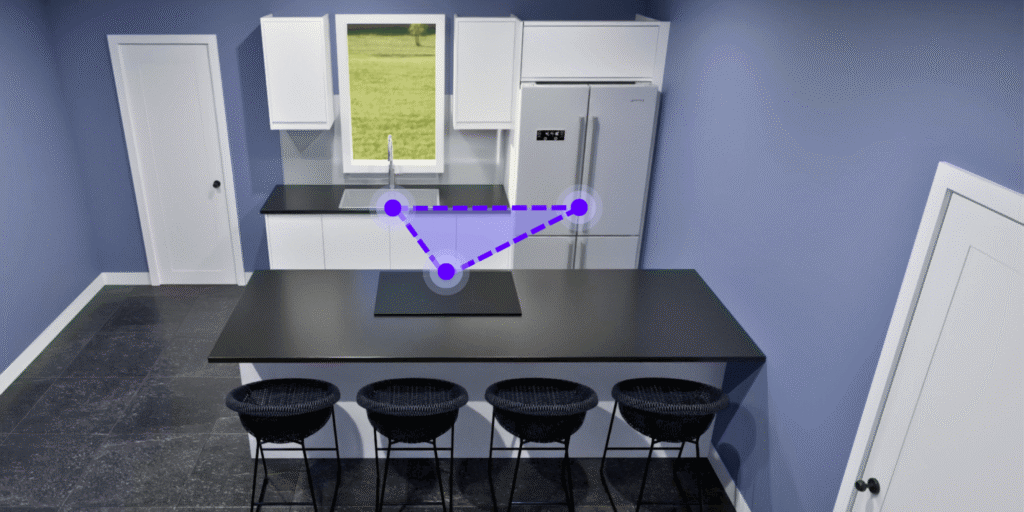
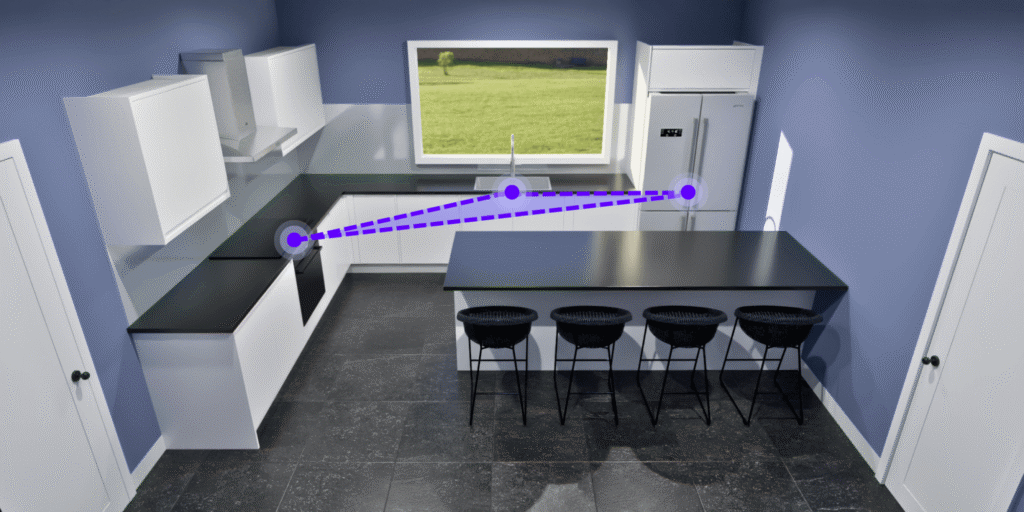
An open layout with the triangle anchored on the perimeter wall, leaving the island free for prep and gathering.
Open-concept kitchen with island. In a kitchen open to the living and dining areas, the island often houses a cooktop or a prep sink and serves as one of the triangle’s vertices. The remaining two stations sit on the perimeter wall. The triangle works well here as long as the island does not also serve as the primary seating area on the triangle-facing side.
Placing the fridge at the edge of the triangle lets family members grab snacks without crossing the cooking path.
Family kitchen with a dedicated snack zone. In households with children or multiple people using the kitchen throughout the day, placing the fridge at the edge of the triangle and adding a snack zone outside the work area keeps casual access from disrupting meal prep. A beverage station or small secondary fridge in a pantry serves the same purpose.

A secondary prep triangle on the island runs independently of the main cooking workflow.
Serious home cook with secondary prep area. For someone who regularly cooks elaborate meals, a single triangle may not be enough. A secondary prep sink on the island, paired with nearby knife storage and cutting surfaces, creates a second workflow that operates independently. The main triangle handles stovetop cooking, the fridge, and primary cleanup. The secondary zone handles prep work and staging.
Kitchen planning tools for triangles and zones
A floor plan shows distances, but it can’t show whether a fridge door blocks the path to the sink or whether two people can pass each other in the aisle. That’s where 3D planning tools make a difference.
For homeowners, free browser-based kitchen planners allow basic layout testing. Drawing the room, dropping in appliances, and checking distances against the triangle guidelines are useful first steps. Many of these tools also offer a 3D view that reveals spatial relationships a top-down plan cannot.
For design professionals and retailers, 3D kitchen planning platforms go further. Designers can build a full layout in minutes, swap between manufacturer catalogs to compare options, and walk the customer through a photorealistic 3D view of the space.
According to the 3D Cloud Kitchen & Bath Project Planning Trends Study 2025, 87% of users say kitchen planning tools are extremely or very helpful when making purchase decisions, and 80% say planning tools reduce remodeling stress. A triangle that looks right on paper but feels wrong in 3D is worth catching early.
Natalia Gesiorski, 3D Cloud’s Head of Training and Design Strategy
“As a retailer, I’d want to know those guide rails are there in the planner, giving me suggestions and calling out if I’m breaking any rules. This creates a more efficient design process and allows for less errors prior to purchase.”
–Natalia Gesiorski, Head of Training & Design at 3D Cloud
How 3D Cloud supports kitchen triangles and functional design
The layout principles covered in this article are exactly the kind of decisions that are easier to make and harder to get wrong when you can see them in 3D.
3D Cloud Kitchen Designer lets homeowners and professional designers build, test, and refine kitchen layouts in a browser-based 3D environment. Draw a room, place products from real manufacturer catalogs, swap finishes, and see the result in a photorealistic 3D view, all without installing anything.
For homeowners exploring layout options, the platform’s inspiration rooms and style quizzes provide a starting point before the first conversation with a designer. For design professionals, features like rapid placement, catalog swapping, and automated presentation exports turn a layout conversation into a complete design in minutes.
Trusted by leading retailers like Lowe’s Home Improvement and B&Q, 3D Cloud is built for kitchen planning as it actually happens: iterative, visual, and grounded in real product data.

Beck Besecker, 3D Cloud’s CEO and Co-Founder
“The future of kitchen and bath remodeling depends on delivering seamless, technology-driven experiences, and 3D, along with smart digital tools, is at the center of making that happen.”
–Beck Besecker, CEO and Co-Founder of 3D Cloud
Request a demo to see how 3D Cloud supports functional kitchen design.


